[su_row][su_column size=”1/2″ center=”no” class=””]
Have you seen the pinterest pictures of greenhouses built out of old windows? I have. As someone who isn’t super handy but is stubborn and slightly obsessive – I couldn’t stop thinking about them. I’d seen lots of greenhouse kits for sale and seriously considered a few of them. Some of the reviews would talk about leaky joints, unstable framework or panels blowing around the property during a good wind storm.
As a thrifty gardener, I can’t see spending hundreds or thousands of dollars on a structure that may come apart after a couple of seasons.
My yard is complicated, so those pre-built Amish greenhouses looked like a good, sturdy solution – but they are delivered as a finished structure. I would need 9.5 feet of clearance (minimum) for them to deliver it into my back yard with one of those little fork lift machines. I have garden beds and fruit trees and a fence with a double gate that wouldn’t provide the needed clearance. I wasn’t thrilled with the prospect of taking down fence panels – so the finished building delivery was out.
[/su_column]
[su_column size=”1/2″ center=”no” class=””]
[/su_column][/su_row]
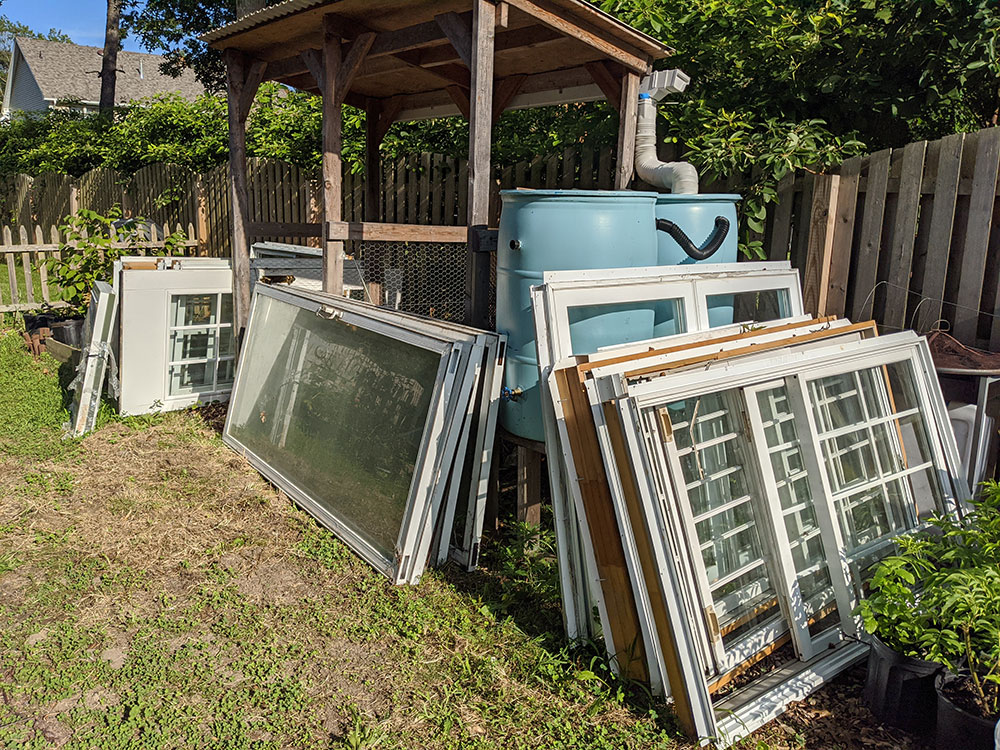
I started to search Facebook Marketplace, Craigslist and Letgo for windows I could use to build one myself. They weren’t hard to find! Lots of people are unloading windows… some brand new, some recently replaced, some just pieces of windows. Many of them were for nearly full price… someone must have picked up the wrong size or ordered too many.
Within a month I had found enough used windows to complete the build and most of them were free! A gentleman in town was renovating his house and replaced all his windows. He simply wanted to old windows GONE – so most of them came from this one source. He even provided a French door, with the handle, lock and hinges intact! Incredible! A friend of mine had been storing some old slider doors for a project, but she offered them to me for the greenhouse instead. My brother in law, a builder, removed some transparent roof panels from an old barn that needed to be replaced. Some of them were in good shape, so we may reuse those on our greenhouse too! I’m thrilled with all these recycled and mostly FREE materials!
[su_row][su_column size=”1/2″ center=”no” class=””]
[/su_column]
[su_column size=”1/2″ center=”no” class=””]
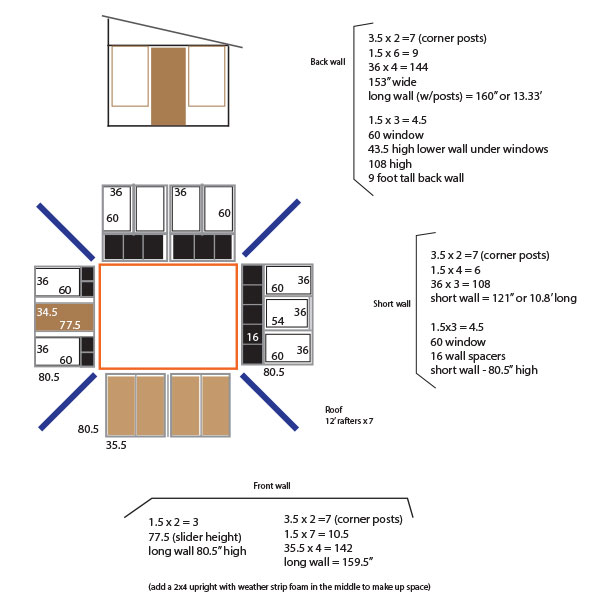
Draw up a plan using the windows to determine lumber needs
Now that I had enough windows, I needed to put together a plan. Since I have no pre-meditated building experience – this part was new to me. I may not be an architect, but I am a graphic and web designer. I put together a drawing using Adobe Illustrator and worked out the measurements so I could determine how much lumber I would need to buy.
I’ve been watching a few YouTube videos of other folks who’ve documented their custom greenhouse builds and their experiences have been very helpful. I’ll create a video gallery of these clips that I found helpful in planning my own custom greenhouse using old windows.
I have a few cinder blocks on site, but I’ll need more to complete a foundation. We have a mill in town, so I’ll be bringing my drawing over there this week to talk to them about buying the wood I need.
[/su_column][/su_row]
Let’s get started clearing the space!
Yesterday, I started taking down the old greenhouse and clearing the area to begin leveling the ground and working on the foundation. Husband helped me get the plastic cover off when we noticed some wasps hanging around the shelves. The doors had been rolled up during the hot summer and they found a nice dry area under the second wood shelf to build a nest!
[su_row][su_column size=”1/2″ center=”no” class=””]
![]()
[/su_column]
[su_column size=”1/2″ center=”no” class=””]
![]()
[/su_column][/su_row]
He was stung by a bald faced hornet that was making a nest on the other side of the house earlier in the summer, so I can’t really fault him for not wanting to be involved in dealing with this discovery. I’m strongly opposed to using chemical pesticides and do whatever I can to avoid it. In this case, I tried to remove the plywood shelves from the frame but the middle shelf was wedged in tightly so I had to bang it up with a rake to get it loose. This upset the wasps. I ran.
[su_row][su_column size=”1/2″ center=”no” class=””]
[/su_column]
[su_column size=”1/2″ center=”no” class=””]
I came back carefully and grabbed my hose so I could shoot it at the nest, which was now exposed, but still fairly protected by the shelving. This is a link to the sprayer I have – it’s available on Amazon. This is the 2nd time I’ve used it to knock down wasp nests around the house. Works like a charm – but be ready to RUN if they come after you! It was a tricky maneuver. It was also hilarious, apparently. Especially since my husband was filming from inside and decided to set my antics to the Benny Hill theme song. Hardee har har.
It worked though – the wasps are GONE now. Next, husband will help me deconstruct the rest of the frame and I’ll work on removing the in-ground bed. Stay tuned!
[/su_column][/su_row]
Related Posts